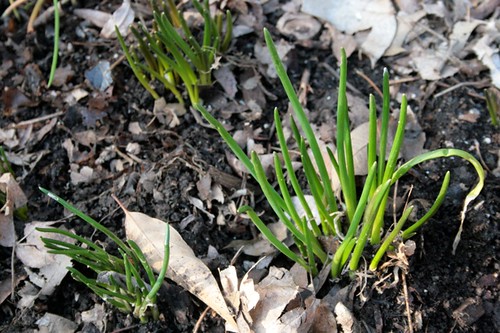
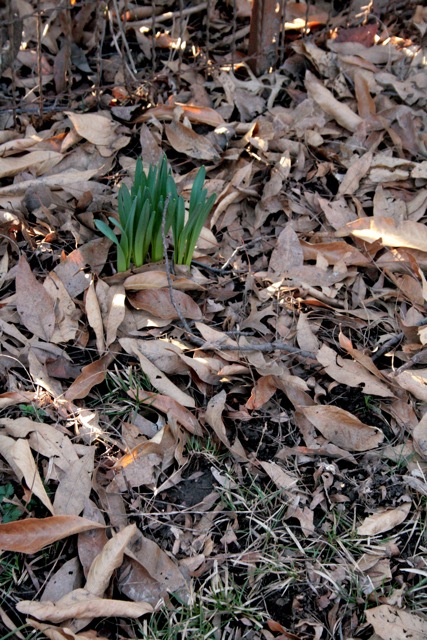
I took this photograph about a week ago, when the temperature hit a balmy 60 degrees and evidence of Spring's arrival was sprouting throughout the garden. Spring officially dropped by on Saturday, but you wouldn't know it from the weather. Snow fell from morning to night, and the temperature hovered in the 30s. I transplanted lots of spring bulbs the day before--daffodils, hyacinths, magic lilies, and Stars of Bethelehem. The cold spell was luckily too brief to kill them, and much of the snow melted today. Here in Missouri, Spring is always a precarious endeavor.
The title is not completely accurate, i.e. this entry will not lay out detailed instructions on building your own cold frame. Instead, it's about how we (my significant other and I) finally built our own cold frame from an old window and some 2X4 cedar boards. For the uninitiated, a cold frame (or cucumber frame, as they say in some parts) is sort of like a miniature greenhouse with a basic frame and a hinged roof on top. What's the point of building a cold frame? Well, it's a good way of extending the season in your vegetable garden. You can start plants early inside the frame or keep plants inside after frost hits. You can also protect young seedlings from possible frost in the early spring.
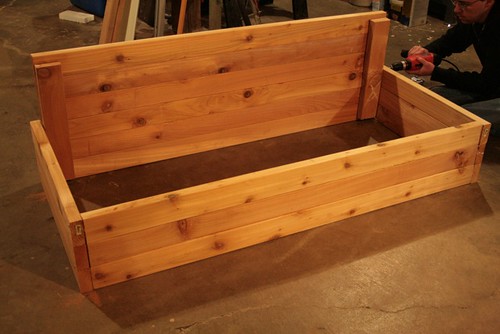
As I mentioned in some entries last year, I've been planning on building a cold frame for a couple of years. Last spring I made a makeshift cold frame using one of my raised beds and a glass window, and it worked well enough for protecting seedlings at the time. I toyed with purchasing a frame, perhaps a high quality cedar box, or a cheaper plastic box, but since a lot of people makes their own using an old window and a wooden frame, things we had access to, it made more sense to go the handmade route. So I chose the biggest window in the basement (the previous tenants kindly left us plenty) and measured it. 61"x28". Plenty of room. I consulted a number of websites, including some videos on YouTube, on the construction. This particular demonstration was especially helpful:
We decided to go with cedar, since it resists decay better than pine, and I want my cold frame to be a more or less permanent structure within the garden. Most of the construction was done by Rob, who laminated and screwed the boards together to ensure sturdiness and keep out any drafts. The photo above should give you a clear enough sense of how he put it together. Very basic, nothing fancy. Once the box was finished, we painted the window and the box, using the same trim paint the previous owners had so graciously left behind. We attached the window with two hinges and used an old metal pull we found on a cabinet in the basement (more leftovers). While the paint was drying, I dug up almost a foot of dirt from the spot where I planned to place the frame, lined the square with bricks for the frame to stand on, and then added a layer of gravels and rocks for drainage.
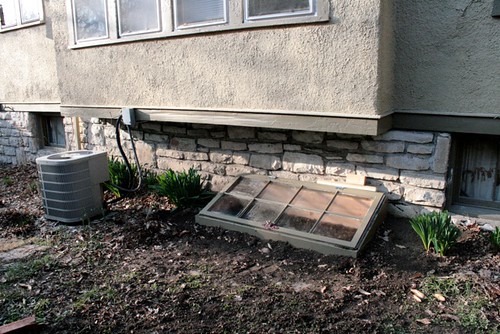
And here's how the cold frame looked yesterday:
While the cold frame is about 6 feet long, it looks pretty small in context of the landscape. The fact that it's buried about 6" in the ground helps too. It's going to be another week or two before I can tuck some seedlings inside, but I've already noticed the window collecting condensation and how warm the soil inside is compared to soil outside. I don't have a thermometer to test it, but I'd guess there's a 10 degree difference.
So that's how we built a cold frame. The task that had been persistently dogging me for over a year is officially finished, and I'm looking forward to another spring. Next, we'll be ripping out the grass along the south strip, tearing down and rebuilding our raised beds, and relocating the vegetable garden to make way for a woodland garden in the backyard. Perhaps we'll make headway on the grotto this summer? Stay tuned!